
Play or Sideload
Compare automatic updates with optional Device Control.
This is the detailed reference for choosing a build, preparing a Hermes host, connecting without QR, remote access, and security checks. If your Hermes Dashboard already runs and your phone can reach it, the Quick Start is the shorter recommended path.
Compare automatic updates with optional Device Control.
Install Hermes, enable the Dashboard, or configure the optional API fallback.
Use LAN discovery, addresses, pairing codes, remote access, and verification.
Choose the build by one question: do you want Hermes to operate the phone, or only be available from it? Both builds come from the same codebase and can live side-by-side.
Fastest setup, automatic updates, and the complete everyday Hermes experience.

The same app plus Device Control for people who want Hermes to operate the phone.
The Release tracks page explains the full capability and safety differences. Building from source is an advanced alternative under the Sideload instructions below.
Grab the signed APK directly from GitHub Releases — works on any Android 8.0+ device.
1. Download the APK. Head to github.com/Codename-11/hermes-relay/releases, open the newest Android release (android-v*; historical Android releases used bare v*), and grab the file ending in -sideload-release.apk — for example, hermes-relay-1.0.0-sideload-release.apk.
Download the .apk, not the .aab
Each release also ships -release.aab files. That's the Android App Bundle format Google Play uses internally — it won't install directly on your device. Always pick a file ending in .apk.
2. Allow installs from your browser (first time only). Android blocks APKs from unknown sources by default:
The exact wording varies by OEM (Samsung and Pixel both say "Install unknown apps"; older versions use "Security → Unknown sources"), but the idea is the same.
3. Install it. Open the downloaded APK from your Downloads notification or the Files app, then tap Install.
4. Verify integrity (optional but recommended). Every release ships a SHA256SUMS.txt. Compare your download's checksum before installing:
sha256sum hermes-relay-*-sideload-release.apk
# Compare the output against the matching line in SHA256SUMS.txtGet-FileHash -Algorithm SHA256 hermes-relay-*-sideload-release.apk
# Compare the Hash column against the matching line in SHA256SUMS.txtIf the hashes don't match, don't install — redownload and try again.
5. Verify the signing certificate (advanced). The APK is signed with the Codename-11 release keystore. To confirm the signature matches the one Google Play pins to the app, compare this fingerprint:
A9:A4:2D:94:20:8B:94:B3:68:5B:01:93:E3:94:9B:90:50:AD:80:60:56:E7:16:3C:FC:E5:11:AF:68:0D:79:4Bkeytool -printcert -jarfile hermes-relay-*-sideload-release.apkgit clone https://github.com/Codename-11/hermes-relay.git
cd hermes-relay
scripts/dev.bat build # Build debug APK
scripts/dev.bat run # Build + install + launch (requires connected device)Hermes-Relay can use two upstream Hermes surfaces:
:9119 — primary Chat, sessions, sign-in, Manage, standard voice, and inbound files:8642 — optional Chat fallback and advanced headless compatibilityAlready have a Hermes server — or someone set one up for you?
If Hermes is already running, or a more technical friend handed you its Dashboard/Gateway address, you're done with this step — skip straight to step 3 (Connect). Everything below is only for setting up the Hermes server itself the first time.
You'll need a reachable current Hermes Agent instance with the Dashboard/Gateway enabled. The optional API server is a fallback or headless compatibility surface. The Relay power-user plugin (step 4) additionally needs Python 3.11+ on the server.
The standard app path does not require the API server or an API key. Enable this surface when you want an explicit API-only/headless compatibility configuration. Installing Hermes and choosing a provider/model is ordinary Hermes setup, so we defer that to the official docs (Installation, Nous Portal, API Server). The block below is just the app-facing minimum.
If Hermes is already installed and a provider is configured, skip the install and hermes setup --portal lines and run only the .env + hermes gateway part.
curl -fsSL https://hermes-agent.nousresearch.com/install.sh | bash
hermes setup --portal                      # log in / pick a provider — skip if already configured

# You, the server operator, create API_SERVER_KEY for this optional fallback.
# openssl generates a strong random value; Hermes Dashboard does not supply one.
# Current Hermes requires a usable key of at least 16 characters when the API
# server is enabled.
mkdir -p ~/.hermes
API_SERVER_KEY="$(openssl rand -hex 32)"
cat >> ~/.hermes/.env <<EOF
API_SERVER_ENABLED=true
API_SERVER_HOST=0.0.0.0
API_SERVER_PORT=8642
API_SERVER_KEY=$API_SERVER_KEY
EOF
chmod 600 ~/.hermes/.env

echo "Android API URL: http://<this-computer-ip>:8642"
echo "Android API key: $API_SERVER_KEY"
hermes gatewayiex (irm https://hermes-agent.nousresearch.com/install.ps1)
hermes setup --portal # log in / pick a provider — skip if already configured
# You, the server operator, create this key for optional Direct API.
# Hermes Dashboard does not supply an API_SERVER_KEY.
# Current Hermes requires a usable key of at least 16 characters when the API
# server is enabled.
$HermesDir = Join-Path $HOME ".hermes"
New-Item -ItemType Directory -Force $HermesDir | Out-Null
$ApiKey = ([guid]::NewGuid().ToString("N") + [guid]::NewGuid().ToString("N"))
@"
API_SERVER_ENABLED=true
API_SERVER_HOST=0.0.0.0
API_SERVER_PORT=8642
API_SERVER_KEY=$ApiKey
"@ | Add-Content (Join-Path $HermesDir ".env")
Write-Host "Android API URL: http://<this-computer-ip>:8642"
Write-Host "Android API key: $ApiKey"
hermes gatewayWhat each line does: API_SERVER_ENABLED=true turns the API server on (it's off by default); API_SERVER_HOST=0.0.0.0 makes it reachable on your network (Hermes defaults to 127.0.0.1, which only the host itself can reach); API_SERVER_PORT is the port the app assumes; API_SERVER_KEY is the required bearer token the app sends on every request when this optional server is enabled. Replace <this-computer-ip> with the address your phone can reach — a LAN IP, Tailscale name, or HTTPS reverse-proxy host. Don't use 127.0.0.1 from Android unless Hermes is running on the phone itself.
Binding to 0.0.0.0 exposes the API to your whole network
0.0.0.0 lets any device on the same network reach the API server, which is why the bearer key matters. On a home LAN behind a router that's normally fine. On untrusted or public networks, don't expose it directly — keep the key set and front it with Tailscale or an HTTPS reverse proxy (see Remote access). To limit it to a single interface, set API_SERVER_HOST to a specific LAN IP instead of 0.0.0.0.
The key is yours to choose — and you don't have to thumb-type it
Three easy ways to get the key onto your phone (no 64-character typing required):
{"api_url":"http://<this-computer-ip>:8642","api_key":"<your-key>"} — then scan it from Scan setup QR.Standard setup — enable the Dashboard/Gateway. This one upstream surface provides primary Chat, sessions, Manage, authentication, standard voice, and authenticated inbound file delivery.
Run the Hermes dashboard on a phone-reachable URL. Because your phone reaches it on a non-loopback address, the dashboard requires auth — it won't start on 0.0.0.0 without a provider configured — so set credentials first, then start it. On a trusted LAN or VPN, username/password is the quick path:
# Run on the Hermes host. Replace choose-a-strong-password with your own.
DASHBOARD_SECRET="$(openssl rand -base64 32)"
cat >> ~/.hermes/.env <<EOF
HERMES_DASHBOARD_BASIC_AUTH_USERNAME=admin
HERMES_DASHBOARD_BASIC_AUTH_PASSWORD=choose-a-strong-password
HERMES_DASHBOARD_BASIC_AUTH_SECRET=$DASHBOARD_SECRET
EOF
chmod 600 ~/.hermes/.env

hermes dashboard --no-open --host 0.0.0.0 --port 9119# Set the same HERMES_DASHBOARD_* values in $HOME\.hermes\.env (use your own password), then:
hermes dashboard --no-open --host 0.0.0.0 --port 9119You sign in with this username/password during connection setup or from the app's sign-in screen. The same session authorizes Gateway chat, sessions, Manage, and standard voice. For stronger setups Hermes also accepts a hashed password (HERMES_DASHBOARD_BASIC_AUTH_PASSWORD_HASH) instead of plaintext, and for a public or hosted dashboard you should use Nous OAuth or self-hosted OIDC rather than a password — see the upstream Web Dashboard docs. On the host's own loopback the dashboard runs without auth; the credentials above are needed only because your phone connects over the network. (The dashboard also reads and writes ~/.hermes/.env, which holds your keys and secrets.)
Dashboard auth and API bearer auth are different
Dashboard sign-in on :9119 uses a native bearer on current gateways, or exact-origin cookies on compatibility gateways, plus short-lived /api/ws tickets. It is sufficient for the standard connection. An API key authenticates only optional Direct API on :8642; dashboard login does not create one, and you should not enter a fake key when no API endpoint is configured.
On first launch:
http://192.168.1.100:9119), then sign in when prompted.That's it — Chat is live, and the Manage surfaces (Skills, Cron, MCP, Profiles, Models/Config) light up too. Manage may ask you to sign in to the dashboard the first time; that same sign-in also unlocks voice for the connection. Relay pairing is not required for any of this.
Home and away on one connection
Save both a LAN Dashboard URL and a Tailscale Dashboard URL — for example http://100.x.y.z:9119 or a separately published https://host.ts.net URL — and Android probes them on every connect using the highest-priority reachable one. These are Dashboard routes, so they do not require an API endpoint or API_SERVER_KEY. Chat and Manage move together — LAN at home, Tailscale when you leave.
The documentation uses deterministic renders from the real Android components, so these screens update with the canonical screenshot set instead of drifting like a hand-recorded demo.
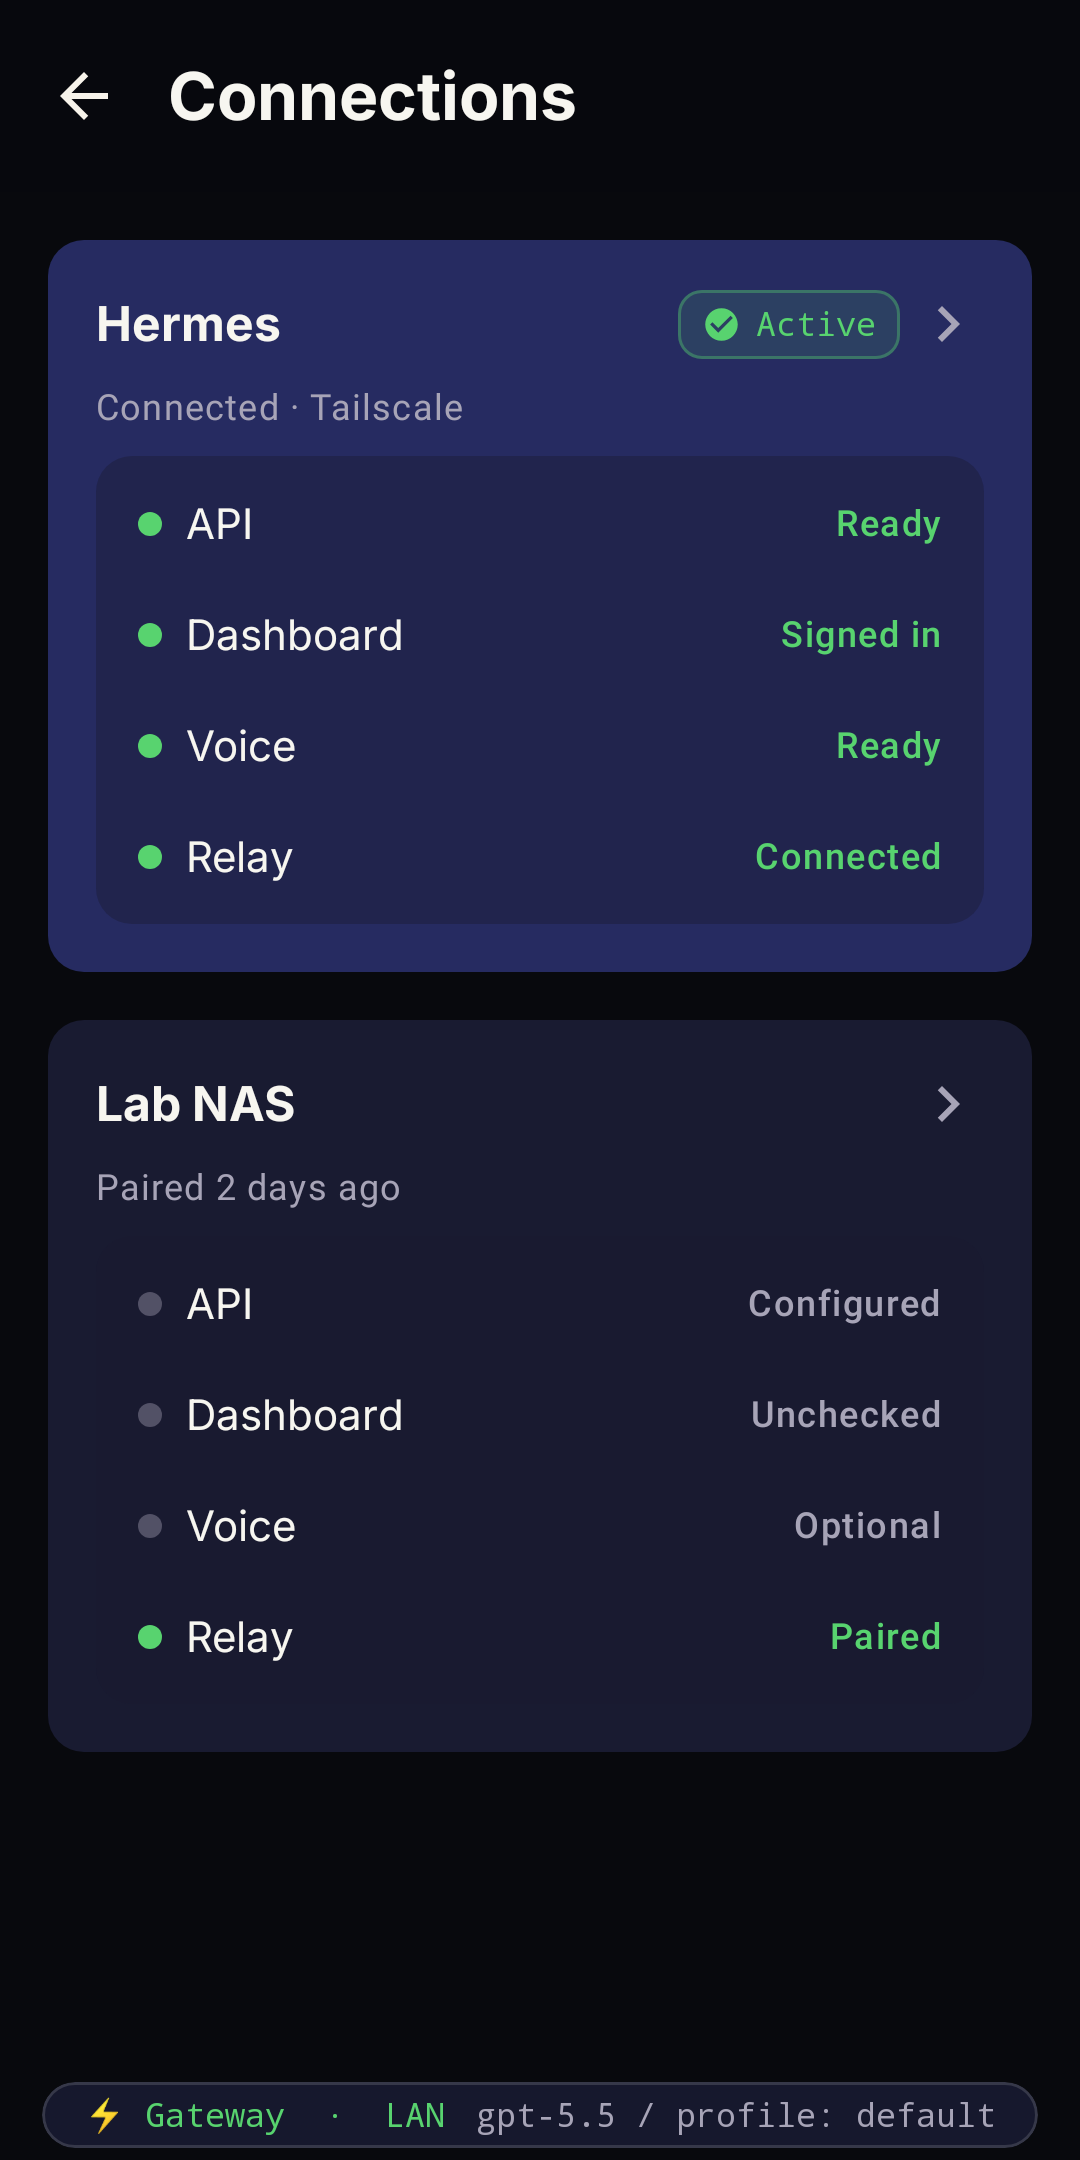
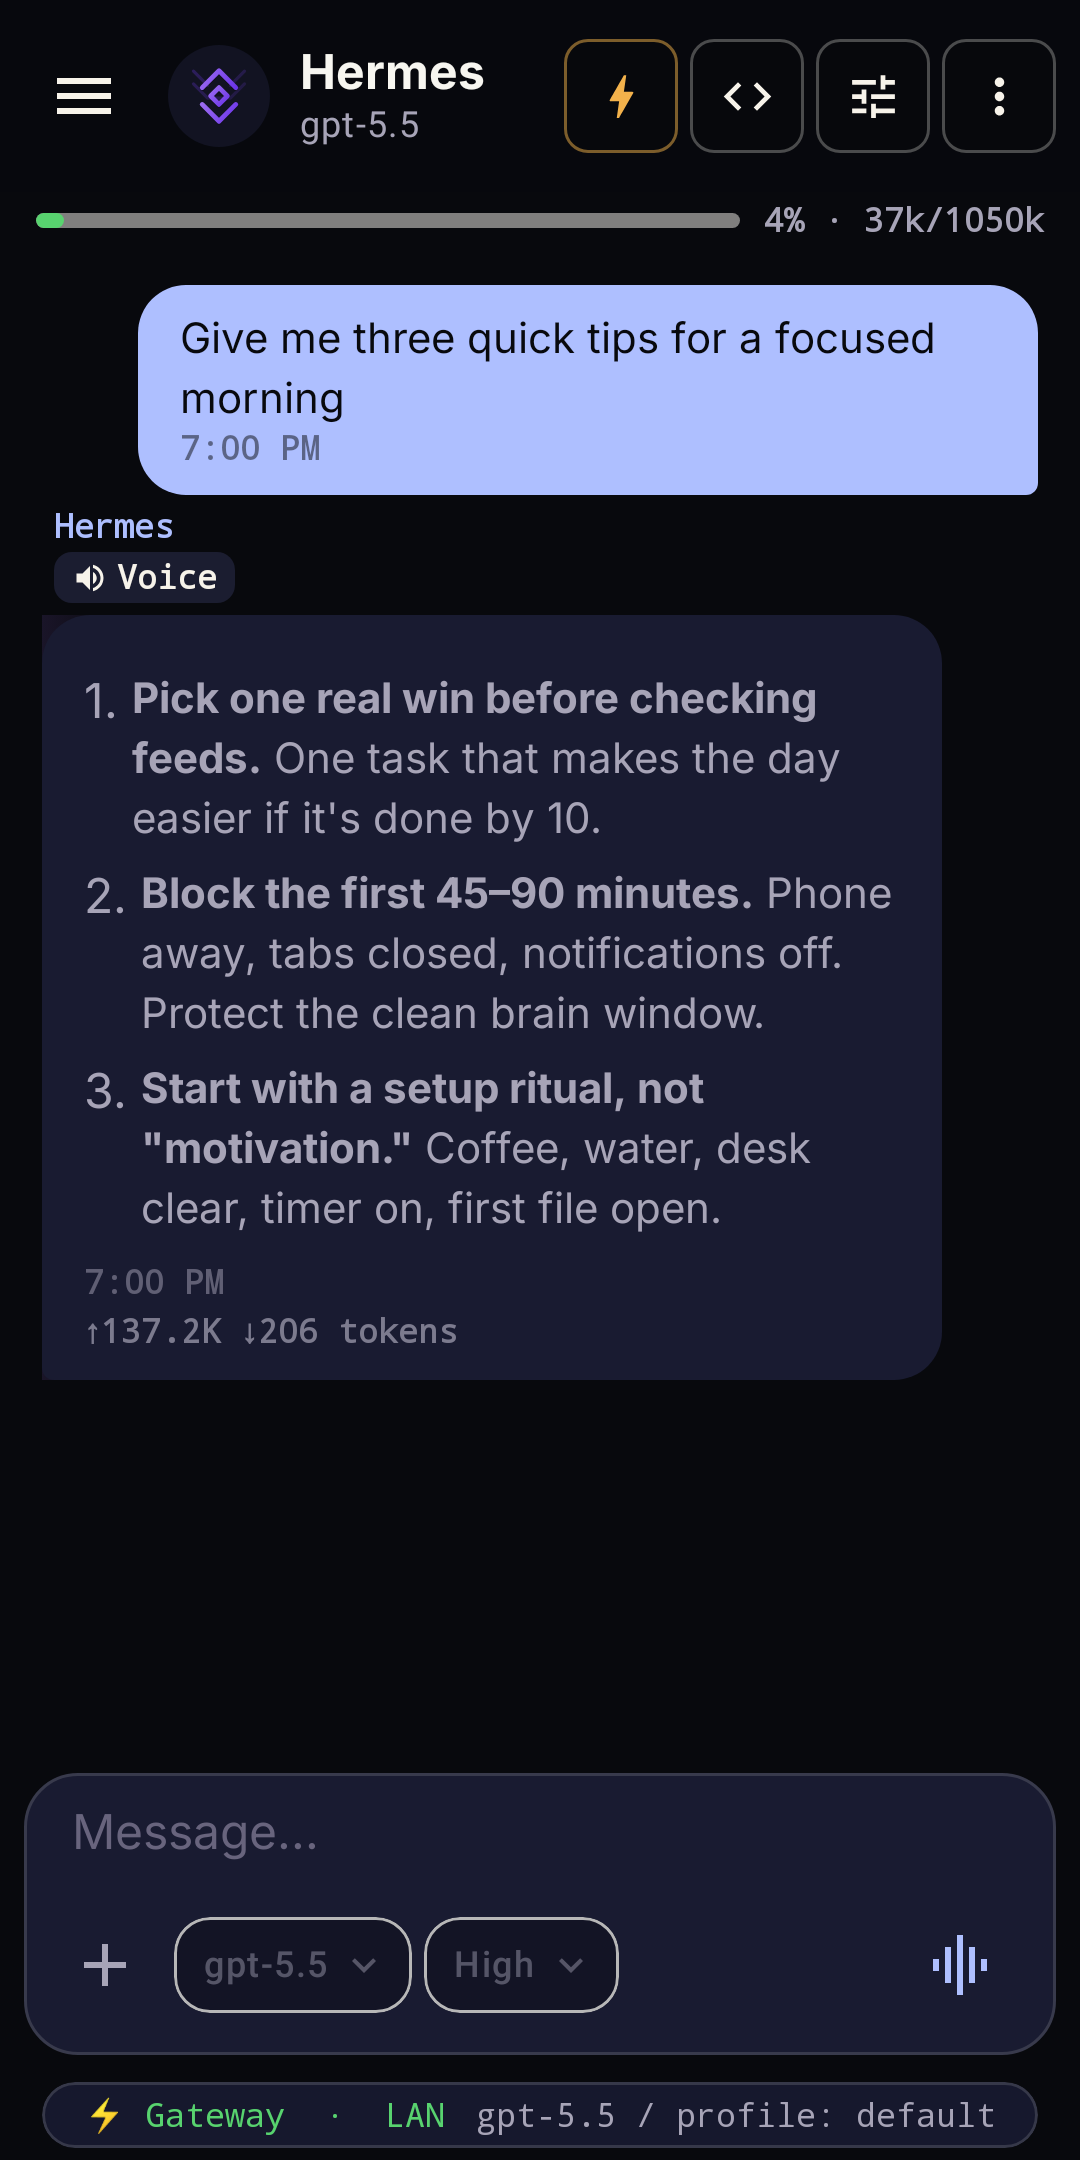
The chat header shows the agent name with a green pulse on the avatar when the Dashboard/Gateway chat route is ready. If the dot is red:
hermes dashboard):9119)More: Troubleshooting · Chat guide · Connections.
The unmodified Hermes Dashboard/Gateway remains authoritative for Chat, sessions, Manage, sign-in, standard voice, and ordinary inbound files. The Relay plugin is an encouraged extension for capabilities upstream Hermes does not yet expose: Terminal/TUI, notifications, desktop tools, Relay sessions, enhanced voice, optional Device Control, and media compatibility or sensitivity metadata.
Hermes-Relay follows an upstream-first rule: when upstream Hermes ships a compatible capability, the standard path should move there and Relay should stop duplicating it. Relay can be unavailable without blocking the upstream connection, but pairing it provides the intended full product experience today.
On the Hermes host:
hermes plugins install Codename-11/hermes-relay/plugin --enable
hermes relay doctor
hermes relay start --no-ssl
hermes pair and hermes relay are supplied by the plugin through upstream Hermes' plugin CLI support; they are not Hermes core commands. Use --no-ssl only on a trusted LAN or VPN.
Restart or refresh the Dashboard/Gateway after installing the plugin, then:
These are deliberately separate actions: Connect mobile app configures the upstream Dashboard/Gateway connection; Pair new device grants a Relay session. Neither converts Dashboard credentials into Relay credentials.
The Dashboard also shows the one-time code and a copyable invite for clients without a camera. Pairing codes expire and are single-use; mint a fresh invite instead of retrying a consumed code.
hermes pairThe command prints a text receipt, a terminal QR, a PNG path, and a pasteable hermes-relay://pair?... invite. Scan the QR from Android. This uses the same signed pairing contract as the Web Dashboard.
hermes pair.hermes pair --register-code <code> command on the host, then tap Connect.Keep manual URL, port, TLS, Direct API, and route-priority overrides under the advanced path. The Dashboard's Auto pairing mode and the app's confirmed QR receipt should be the default.
Use the legacy installer only when you also want the systemd user service, shell shims, external skill-path registration, and the old clone/update workflow:
curl -fsSL https://raw.githubusercontent.com/Codename-11/hermes-relay/main/install.sh | bashThe optional compatibility monkeypatch is separate from normal Relay pairing. Modern Vanilla Hermes chat, Manage, and dashboard voice do not need it. Check it with hermes relay compat status; install it only for older Hermes builds or compatibility-only route gaps:
hermes relay compat status
hermes relay compat install
hermes relay compat remove
For persistent deployment, Docker, systemd, and TLS options, see the Relay Server docs.
Multiple Hermes servers
The app can save more than one Hermes server, such as Home and Work. Add or switch servers later in Settings → Connections.
Hermes-Relay supports multi-endpoint pairing: one QR carries every network path your server is reachable on, and the phone auto-picks whichever is reachable at the moment — LAN, cell, tailnet, or public reverse proxy — without re-pairing when you change networks.
--mode auto. hermes pair --mode auto (on the server) probes the LAN, detects Tailscale if it's running, and emits an ordered candidate list in the QR. Add --public-url https://hermes.example.com to include an external reverse-proxy or Cloudflare Tunnel URL.hermes-relay-tailscale enable publishes https://host.ts.net:10443 on a dedicated tailnet listener and proxies local Dashboard :9119 plus its same-origin Relay ingress. The dedicated port avoids conflicts with an existing Traefik, Caddy, or nginx HTTPS listener on :443. A raw http://100.x.y.z:9119 address remains valid when Dashboard is deliberately reachable there, but it has no application TLS. Prefer a reverse proxy + Let's Encrypt or a self-hosted VPN? Both work as long as the phone can reach each capability you configured.--mode accepts auto, lan, tailscale, or public. --prefer <role> promotes a named role to priority 0 (e.g. --prefer tailscale).For the full matrix (Tailscale, Caddy + Let's Encrypt, Cloudflare Tunnel, self-hosted WireGuard, plaintext over trusted VPN) with working config blocks, see Remote access and the Connections page.
Manage uses the Hermes dashboard/admin server and stores its native bearer or compatibility cookies separately from Relay pairing credentials.
dashboard.public_url and provider for a loopback reverse proxy. Do not copy the internal token to Android.native_pkce is advertised. Compatibility gateways post to /auth/password-login and store exact-origin Dashboard cookies.native_pkce, Android uses the upstream system-browser /auth/native/* broker. Older gateways use the in-app /auth/login?provider=... cookie compatibility flow. Both verify /api/auth/me and /api/auth/ws-ticket.<public-dashboard-origin>/auth/callback with the provider. Hermes normally derives the origin from trusted proxy headers; set upstream dashboard.public_url / HERMES_DASHBOARD_PUBLIC_URL only when that reconstruction is unreliable. Native PKCE uses that origin for its browser transaction only. On the older cookie flow Android verifies the installation and asks before saving a different authenticated origin. You do not enter a second sign-in URL during normal setup./api/auth/providers advertises supports_password: true.Relay pairing does not replace dashboard login, and dashboard login does not mint an API key: it matches the Hermes Desktop remote-gateway path by authenticating /api/ws and /api/pty with the Dashboard session plus a single-use ticket from /api/auth/ws-ticket. A Gateway conversation keeps that owner when sign-in expires or the network fails. Direct API is an explicitly selected compatibility connection; it never silently takes over a Gateway conversation.
HTTPS remains the default for public addresses. In Remote gateway, the gateway address editor, or an extra route editor, an HTTP address outside the recognized private ranges displays a warning and an unchecked acknowledgement. Confirm it only if you accept the risk of sending credentials and conversation data without HTTP-layer encryption. The app does not detect a VPN, verify its route, or stop requests when the VPN disconnects.
The exception is saved for this connection and exact scheme, host, and port. Changing the address requires fresh acknowledgement; it does not mark the route encrypted, bypass Dashboard authentication, or grant Relay access. Editing keeps the saved gateway identity and history references. A changed credential origin retires that gateway's old Dashboard authentication and requires sign-in again. Cancelling or a failed validation leaves the old address intact.
A generic 401 means authorization failed, not that dashboard.public_url is necessarily wrong. If public status advertises no authentication but protected requests fail, check the host's bind/proxy mode, configured provider and external public URL. For ordinary expired sessions, sign in again and retry the same conversation. Never delete history or switch to another profile as a workaround.
During onboarding:
http://192.168.1.100:9119 — or discover it on LAN.After onboarding: open Settings → Gateways and select a Hermes host. Advanced contains only compatibility controls: optional direct API URL/key, an explicit direct Relay endpoint override, and the insecure-development toggle. Use Pair Relay / Re-pair for the shared QR, enter-code, or show-code flow. Edit the normal Dashboard/Gateway address and network paths under Routes.
For Vanilla Hermes setup, use discovery or enter the Dashboard/Gateway address. If a QR includes a Relay block, Android shows the Relay pairing confirmation and TTL/grants picker. Legacy API-only QRs still create an advanced compatibility connection.
If you used the upstream plugin manager:
hermes relay compat remove --all   # optional; only removes legacy compat hooks
hermes plugins remove hermes-relay
If you used the legacy installer:
bash ~/.hermes/hermes-relay/uninstall.sh
# or, if the clone is already gone:
curl -fsSL https://raw.githubusercontent.com/Codename-11/hermes-relay/main/uninstall.sh | bash
It removes the legacy systemd service, shell shims, editable package, external skill path, clone, and compat hook. It is idempotent and never touches state shared with other Hermes tools. Flags: --dry-run, --keep-clone, --remove-secret. For agent-assisted cleanup, use the Agent Cleanup Prompt.